
Linux Setup on Modern Hardware
Published:
A guide to setup linux os on modern hardware

Introduction
Linux is a more than a kernel. For me it is is a symbol of freedom and privacy as far software and specifically operating systems is concerned and also the major advantage of using Linux is that it is a UNIX based operating system and thus it follows the UNIX philosophy and in addition to why it is better than mac OS in my opinion is because of the fact that all modern Linux distributions are GNU/Linux or as it better to call it GNU+Linux distributions (distros for short). Hence all modern Linux distros come with the added benefit of GNU programs and GNU compilers out of the box.
But, modern hardware manufacturers make installing Linux on modern hardware extremely difficult and often an impossible task. A large reason for this blame goes to Microsoft, as most OEMs are required to ship Windows 10 as the default OS and thus consumers are stuck with the it and stick with a rather poor experience of using an OS that is not well optimised and extremely heavy in system resources.
Recently I changed my personal laptop and bought a new modern device with all the bells and whistles of a new 10th generation processor and fast nvme SSD storage, and I was also faced with the same dilemma of whether to stick to Windows 10 (to protect my warranty) and grind at using the abominable compromise that is Windows subsystem for Linux (WSL) or to shift to complete clean install of my preferred Linux distro of choice i.e. Manjaro Linux (KDE edition). After a few days of using Windows 10 with WSL enabled I lost my patience as soon as my OS asked me (or as I should rather say forced me to Restart my computer in the middle of me working on a project. So I decided to take my trusted USB stick and make a bootable USB with Manjaro Linux. But little did I know that the roadblocks were just starting.
A computer is like air-conditioning it becomes useless as soon as you open Windows.
Linus Torvalds
OEM unlock and Secure Boot
Often laptop manufacturers lock the acces to the access to the BIOS. In such cases it is very difficult to install Linux as there are many I/O changes required to be made from the BIOS and thus it is suggested that you don’t buy a laptop from such OEMs. It is best to buy laptop from one of the major players in the laptop market i.e. Dell; Lenovo or Acer as they generally make laptops that have Linux preinstalled and thus their hardware and BIOS support user configuration and Linux installation. One can however contact the vendor/search the forums of the respective manufacturer to look for ways to unlock the BIOS.
Disable Secure Boot
The first major modification to make in the BIOS is to disable secure boot and change the boot mode from
UEFItoLegacy + UEFI.It is possible that the option to change the secure boot option is greyed out in the BIOS i.e. it is inaccesible. If that is the case then it is best to set a password to access the BIOS. Enabling a password makes the option to disable secure boot accessible to the user.
Enable AHCI for SSD in Windows 10
This option is only necessary for SSD users. By default, the disk setting in BIOS is set to the RAID or Optane Memory + RAID. In either case, modern Linux installers are unable to detect the SSD during the installation process as the Linux kernel hasn’t received support for RAID or Optane memory yet. So we need to change the disk setting in BIOS to AHCI but this option is usually inaccesible to the consumers be default. To make it accessible we need to first enable it in Windows 10 by making some registry edits and installing latest AHCI drivers. The following are the steps -
While in Windows, press the
Win+Rkeys to open Run, typeregedit, and click/tap onOKto open Registry Editor.If prompted by UAC, click/tap on
Yes.In the left pane of Registry Editor, browse to the key location below
HKEY_LOCAL_MACHINE\SYSTEM\CurrentControlSet\Services\iaStorV.
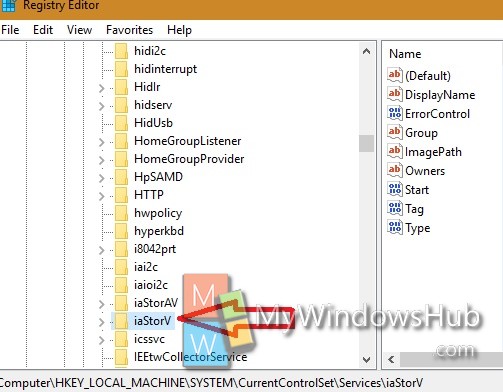
In the right pane of the
iaStorVkey, double click/tap on theStartDWORD to modify it. (see screenshot above)Type
0(zero) for AHCI, and click/tap onOK.In the left pane of Registry Editor, browse to the key location below.
HKEY_LOCAL_MACHINE\SYSTEM\CurrentControlSet\Services\iaStorAV\StartOverride
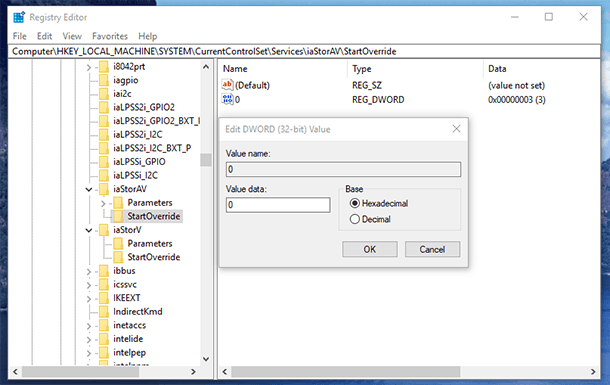
In the right pane of the
StartOverridekey, double click/tap on the0DWORD to modify it.Type
0(zero) for AHCI, and click/tap onOK.In the left pane of Registry Editor, browse to the key location below.
HKEY_LOCAL_MACHINE\SYSTEM\CurrentControlSet\Services\storahci
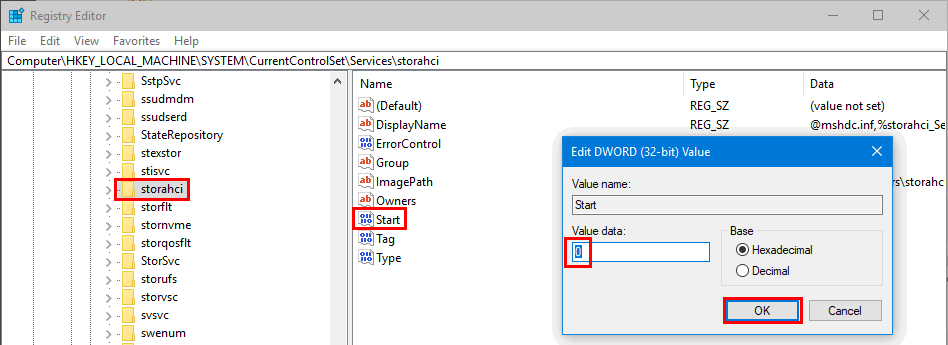
In the right pane of the
storahcikey, double click/tap on theStartDWORD to modify it. (see screenshot above)Type
0(zero) for AHCI, and click/tap onOK.In the left pane of Registry Editor, browse to the key location below to see if you have the
StartOverridehere. If you don’t, then go tostep 15below.If you do, then, in the right pane of the
StartOverridekey, double click/tap on the0DWORD to modify it.Type
0(zero), and click/tap onOK.When finished, close Registry Editor.
Boot the computer to your BIOS or UEFI firmware settings.
In your BIOS or UEFI firmware settings, enable AHCI, and save & exit to apply and restart the computer.
Note: These settings will vary per brand and model number of motherboard. Please read your motherboard manual for more specific details about how to change SATA/NVME settings for it.
When Windows starts, it’ll automatically install AHCI drivers.
When finished, you’ll need to click/tap on Restart Now to restart the computer one last time.
Now, we can install Linux on our machine without any issues. You can choose any distro of your choice but starting with Ubuntu or an Ubuntu based distro is always a great option as it is a stable ditro and great for beginners and experts alike and has a great community behing it. Also KDE is the best desktop environment in my opinion and thus Kubuntu in my opinion is the best distro to start with.
Just get it on a bootable USB and boot into the live environment to test the input devices like keyboard, touchpad, mouse and also wifi connectivity to ensure that everything is running smoothly and voila, there you have linux running.
Leave a Comment